Session View vs. Arrangement View
Should I use Session View or Arrangement View? The answer to this question is “Yes”. This debate is one that I wish wasn’t a debate.
One of the awesome things about Ableton Live is how flexible it is, regardless of what View you’re using. There are some people who will argue why one View is better than the other, but I don’t think that is helpful because it doesn’t give you a full picture of what Ableton Live can do. It would be similar to asking if you should only post pictures to Instagram or only post Stories. Your Instagram experience would be very different if you decided to only use one feature over the other. To have the best experience, you use both features depending on what you’re trying to accomplish.
The same goes for Ableton Live. Session View and Arrangement View work together to help you utilize the full power of the application. I’ll go over some of the basic features of each View to give you a better understanding of when you may want to use each View. Ableton Live has two main Views – Session View and Arrangement View. You can access these different Views by pressing the “Tab” key or clicking on the icon in the top right corner that looks like the Ableton Live logo (did you know the Ableton logo represents both Views?).

Session View
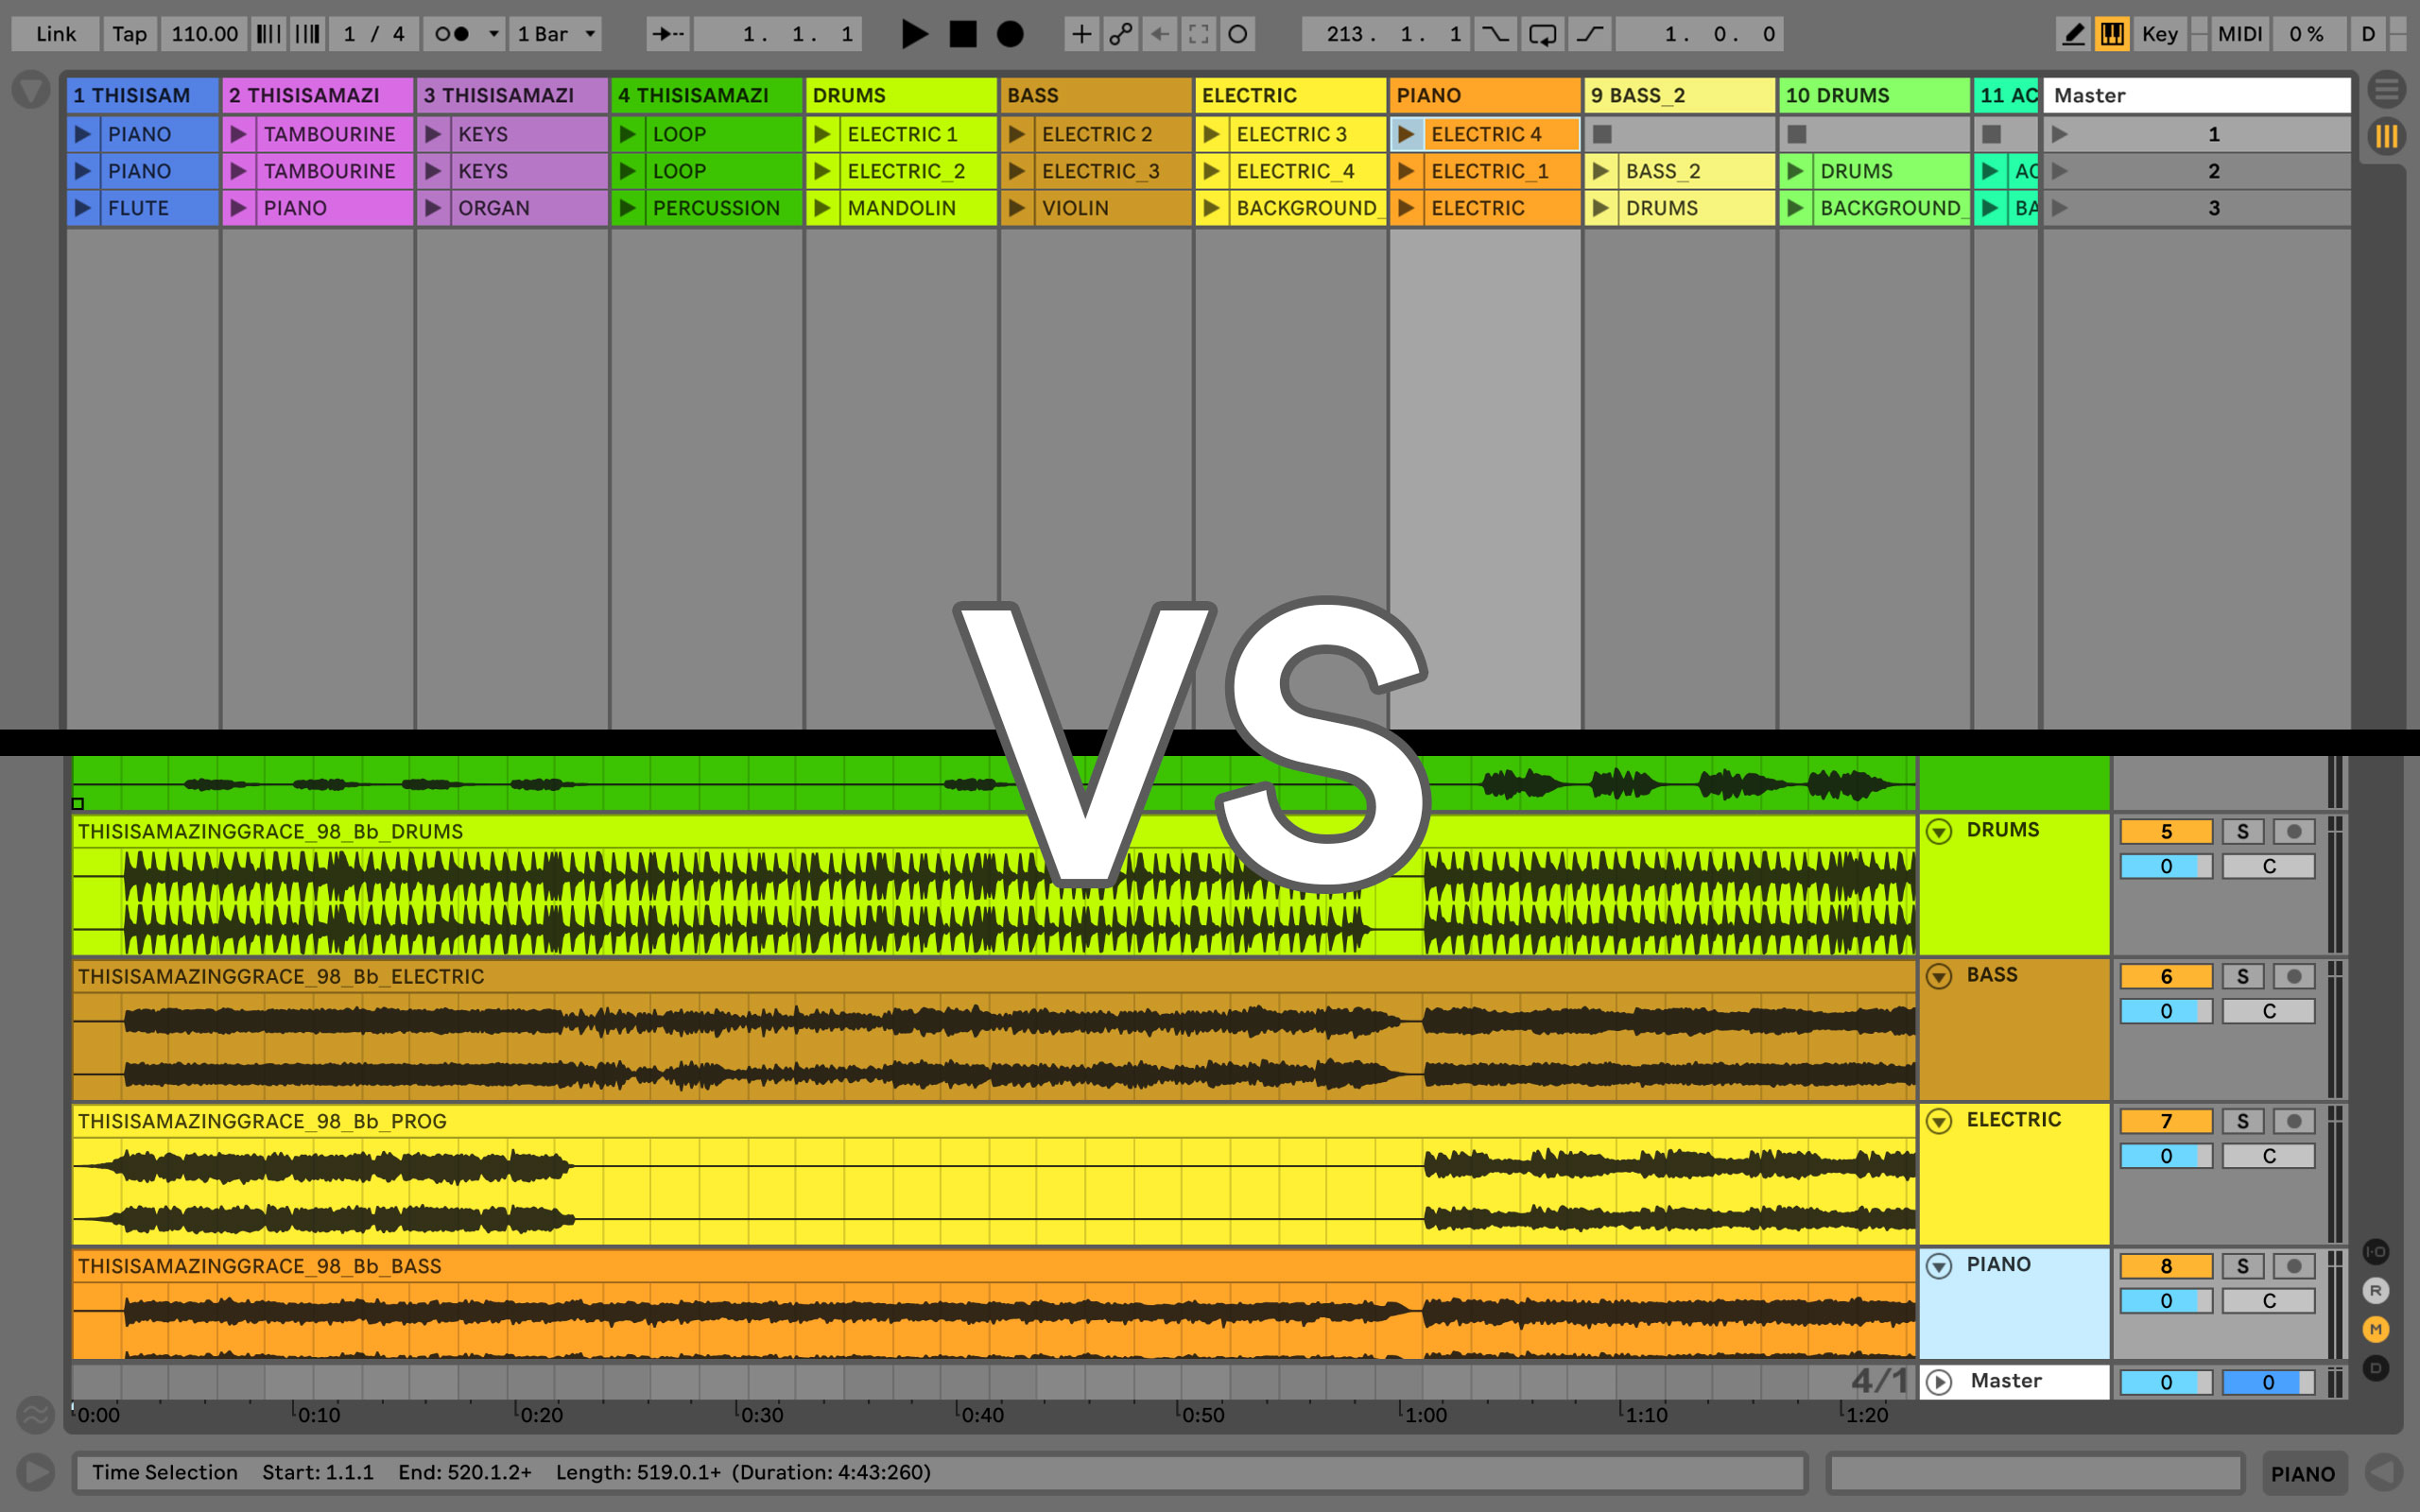
Session View is the first View that is displayed when you open Ableton Live. It looks like a big grid, similar to Microsoft Excel. The vertical columns are Audio and MIDI tracks that you can use for audio files and software instruments. It looks like an audio mixer with volume faders, mute and solo buttons. The horizontal rows are called “Scenes”. Think of a Scene as a song in your setlist, or a section of a song if you like to break down your tracks even further. Each rectangle in the grid can be loaded with an audio file (Bass.wav, Guitar.wav, etc) or a MIDI clip, depending on the type of track it is. You can also record directly into an audio clip or MIDI clip – which makes Session View really great for creative music production. Each clip you record will automatically Loop, which then lets you start recording another one – adding layers as you go. This lets you create & innovate while recording.
Session View is the first View that is displayed when you open Ableton Live. It looks like a big grid, similar to Microsoft Excel. The vertical columns are Audio and MIDI tracks that you can use for audio files and software instruments. It looks like an audio mixer with volume faders, mute and solo buttons. The horizontal rows are called “Scenes”. Think of a Scene as a song in your setlist, or a section of a song if you like to break down your tracks even further. Each rectangle in the grid can be loaded with an audio file (Bass.wav, Guitar.wav, etc) or a MIDI clip, depending on the type of track it is. You can also record directly into an audio clip or MIDI clip – which makes Session View really great for creative music production. Each clip you record will automatically Loop, which then lets you start recording another one – adding layers as you go. This lets you create & innovate while recording.
Another great benefit of Session View is the simplicity it gives you when running multitracks. You can create a setlist using Scenes (the horizontal rows). Then on each row, you can load your multitrack audio stems for a song in each audio track and use a controller to start each song. You can easily set the BPM Tempo and Time Signature per Scene (which is not as easy in Arrangement View). You can also click and drag Scenes to re-order your worship setlist. All of the audio files will move with it. However, if you’re wanting to do crossfades and automation, you’ll want to use Arrangement View.
Session View Summary
Session View is excellent for people who have tracks already arranged in the order they want to play the song. It’s great for simply starting a song, playing through it and then starting the next song, as well as quickly customizing the tempo and time signature.
Average Time To Create Setlist: 5-10 minutes
Arrangement View
Arrangement View looks much more like your standard music recording software (Logic, GarageBand, Pro Tools, etc.). It consists of horizontal audio and MIDI tracks that run down a timeline from left to right. It’s perfect for creating and editing song arrangements. You can record instruments into Arrangement View down the timeline, which gives you a big picture overview of how your song is laid out and organized. You’re able to see the audio waveform for each track, which is helpful for a visual representation of where you are in the song. It’s great for multitrack recording because you can see exactly what’s happening as you are recording multiple instruments.
Editing audio and MIDI in arrangement View is very simple because you can highlight sections to delete time, copy time, and duplicate time (this is not a great experience in Session View). Arrangement View is perfect for customizing and re-arranging a multitrack, like moving a chorus around or adding another bridge at the end of a song. You can also add locators for each section in your song which can be mapped to a controller like Looptimus. These allow you to jump between sections of a song during live performance. Arrangement View is also excellent for adding crossfades and fades to create smooth transitions between songs, as well as adding tempo changes.
Arrangement View Summary
Arrangement View is great for editing and recording tracks. It’s also perfect for worship leaders who want to press play once and let your entire worship set run through automatically with crossfades, automations and tempo changes.
Average Time To Create Setlist: 30 – 60+ minutes
If you’re curious, I use Arrangement View to edit, record and customize my tracks. Then I load those tracks into Session View to create a setlist and use during worship. If you want to learn more, check out abletoninworship.com.
Matt McCoy
0 Comments