How to Automate Your Tracks in Logic Pro

Automation is the automatic changing of parameters to your tracks. In music production, it is a very important tool when it comes to getting the sound you want. Automation gives sounds the movement it needs to bring it to life and make them more compelling.
Automation Mode
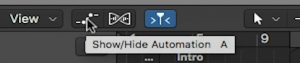
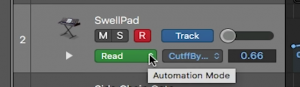
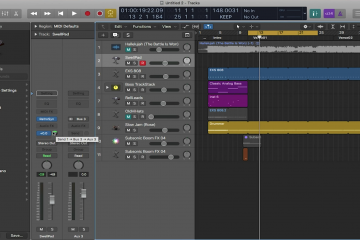
To use automation in Logic, you will first need to toggle automation mode. The automation button can be found at the top of the main window under the control bar. Once toggled, each track will have three new sections under its name. The very left section shows which automation mode that track is in. There are four different modes and we will go over them below. The middle section shows which parameter is being automated, whether it be the volume of that track, a certain effect from a plugin, etc. The right section shows the value of what is being automated in relation to where the playhead is located.
Setting Up Automation on a Track
Now that you know the different sections of automation and how to turn it on, let’s go through how to add it to a track.
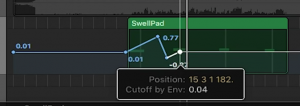
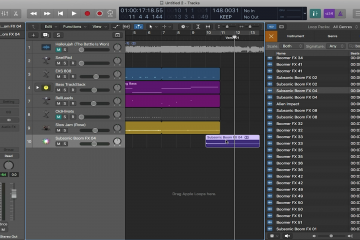
Once toggled on, click the waveform/midi section of the track. An automation line should appear. This line represents the automation value of the parameter. When the line is at the very top of the track, the volume will be at its highest. When the line is at the bottom of the track, the volume will be very quiet or muted. If you click and drag the line, you will notice that the whole line will move. This changes the volume level, but it won’t be automating yet.
The automation comes in when you place multiple pivot points on the line at different values. You can add a pivot point simply by clicking on the line. These pivot points are unlimited and you have the freedom to create and move them anywhere. Using these pivot points in succession at different values and times is how Logic’s automation works.
Let’s say you have a piano track and your song has a nice piano intro. You want the piano to be nice and present during the intro, then dial it back down when the verse comes in.
First toggle automation mode on in your session. Go to your piano track and you should see the three automation sections. Click on the middle section and select volume so that Logic knows to automate the volume for that track. This may already be selected as the default parameter. Go to the automation line and find where the intro ends and the verse starts. Make two pivot points, one right before the end of the intro section and one right as the verse has started. By default, the line is at unity gain, so let’s leave the intro alone. We want the piano track at the verse to be quieter, so click and drag the second pivot point down to -5db. The automation line will now slope downward once it reaches the verse. Solo the piano track and listen back to hear your new automated transition from the intro to the verse!
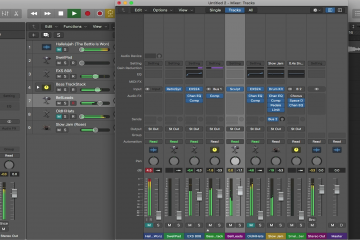
You also have the ability to automate as many parameters on one track as you like. Simply change the automation parameter and a fresh new automation line will appear. If you then go back to any parameters that you have already automated, they will then reappear with your changes intact.
Automation Modes
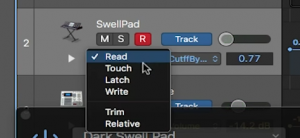
There are four automation modes to choose from.
Read Mode
This is the most popular one as it is the default mode when opening automation mode. In the piano example, read is the automation mode I was using. It will simply read the automation line as it has been drawn.
Touch Mode
With touch mode, when playing back the track, you can change the value of the parameter by moving the fader/knob within the actual plugin and the automation line will move with your changes. If you let go of the knob or fader that the automation is linked to, it will snap back to the original value.
Latch Mode
Latch mode is very similar to touch mode except that when you let go of the knob or fader the automation is linked to, it will not snap back to the original value and stay at the value you left it.
Write Mode
Write mode is just like latch, except that whether or not you change the value with the knob or fader, it will overwrite the previous automation. This mode is the least popular as it can be destructive to your previous edits.
Automation is an advanced tool for music producers but gives the necessary liveliness a track needs. With Logic’s easy automation system and modes, you can get started automating in no time. Tune in next week to read our last blog of the series on exporting your tracks.
2 Comments
Alba Martin · May 29, 2020 at 4:08 am
Hey, this is a great article – thanks for posting. How could I get in touch with the Author? I have some further automation ideas. Thanks! Alba
Loop Community · May 29, 2020 at 11:34 am
Hi Alba,
You can email your questions to support@loopcommunity.com.
Thanks!